Wednesday, January 28, 2015

Unity Script: Oculus Selection with Coherent UI Web Views (3 of 3)


The last cool thing in this Oculus Pointer Trilogy post is how to work with Coherent UI Web Views using the Oculus Pointer we made in post 1
To see how to select 3d GameObjects (like buttons) check out post 2
____________________________________________________________


Raycasts

If you read Post 2, you'll remember I mentioned that Raycasts are kind of backward from the way you normally think of input going (player-out). Fortunately Coherent UI is pretty much self-contained so we can put the Raycast in the UI script.

Basically: we're going have Coherent UI respond to the pointer, rather than having the pointer trigger Coherent UI.

Why?
A combination of reasons coming together to a single solution

  • Unity mouse function actually IS a back-end Raycast
  • Coherent UI calculates what you clicked on based on the view texture's x/y coordinates
  • RaycastHit.textureCoord is the only way I know to find and send the texture x/y
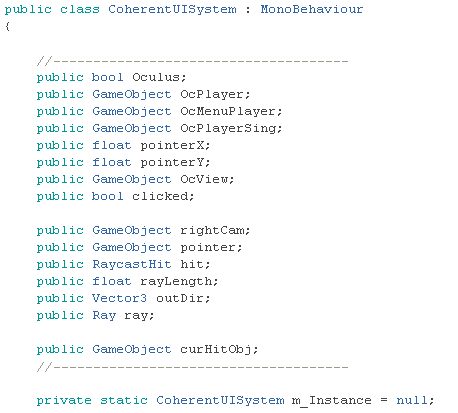
____________________________________________________________


Coherent UI System

This is the script that comes with your Coherent UI system that we'll be adding to in order to do this little trick. I won't be showing the full altered script, but I'll give you the placements for our entered code snippets.

____________________________________________________________

Public Variables
The first thing to note when you're looking at the Coherent UI System script in the editor is that almost all of it's values are private. We can't see them, therefore can't check mid-UI navigation.
It's also worth noting all those specialized CoUI variables don't share well between functions.

You're going to want to add a few public variables for you to work with inside and outside the script. I've made comment lines on either side to make it obvious where I've changed the script.


____________________________________________________________


Finding Your Assets
We're going to do this in two ways. OnLevelWasLoaded(), which we'll add, and through Start(), which we'll add to. This will tell the script whether or not to look for Oculus interaction


Here I have it looking for any of the Oculus prefabs I use that could interact with Coherent UI. If any are present, expect to interact with an Oculus pointer

  • Make sure to use your own asset names


____________________________________________________________


void TrackInputFocus ()
This is a void() that runs every Update cycle. Find it, we're going to put our Raycast here.

The script:

Note

  • See that hanging "} else {" at the bottom? That closes "if (oculus) {"
  • don't forget to close if after the end of the next (original) raycast 


The Logic:
What we're doing here is


  1. Defining a ray from the right eye out through the pointer. This defeats the distortion caused by the Oculus program.
  2. Making a Raycast with that ray
  3. If the raycast hits a CoUI view, it records the x/y coordinate hit on the view texture and responds accordingly
  4. If the mouse is clicked while the raycast is pointed, it will click that point on the view.
____________________________________________________________


Mouse Position
There's one last thing we need to do at the end of the script to update the mouse position in Oculus mode.


____________________________________________________________


Final Step
There's a special way to set up your Oculus pointer-using scenes.

  1. Remove the OVR Manager script from your Oculus player
  2. Make a GameObject tagged MainCamera that does not have a camera component on it
  3. Put the OVR Manager script on that
This arrangement was found by trial and error. I know only that it has something to do with Coherent UI needing a Main Camera and getting bugs doing it other ways.


____________________________________________________________


This is actually remarkably simple and mostly copied from other bits of the same function. The really tricky part was identifying the texture coordinate technique. The rest is just variable management. :D

Tadaa!


____________________________________________________________


All blog posts by UnityGirl are inspired by my work with Brunelleschi: Age of Architects on the Aesop Games team. Download the current Unity client On IndieDB

Saturday, January 24, 2015

Unity Tips: Lighting vs Ambient Light

Simple solution to a basic processing issue. Especially if you don't have Unity Pro and / or haven't mastered baked lighting, lights slow your game down.


_______________________________________________________________

Lighting Your Scene
Point 1
Every individual light rendered on every texture has to be processed.

Point 2
Beginning scenes are hella dark. You HAVE to use lighting to be able to see your assets.

Point 3
You don't actually have to use lights to fix this problem.

  • Hit Edit
  • Pan down to and select Render Settings 
    • Render as in how things show up
  • Click the dark gray box labeled Ambient Light. 
    • I usually go with a very light gray, but pale yellow is good for simulated sunlight
    • blue is good for night or dream scenes
    • green to enhance a forest glade
  • Best Part: pick a light color and you won't need lights to see!


_______________________________________________________________


Also in Render Settings

You might want to look around further in this menu area for other useful ways to tweak your scene.

  • Skybox - a special texture set that creates the illusion of 3d sky
    • many skybox sets are available in the assets store
    • you can also follow a guide on how to make your own skyboxes
  • Fog - a player view shortening and somewhat magical effect, especially set to odd colors
    • obscures overhead map views, but great for immersion
  • Halo and Flare - camera effects I haven't actually played with yet.

_______________________________________________________________

Secret in Quality Settings:

Go to Edit -> Project Settings -> Quality and you'll find an interesting setting.
"Pixel Light Count" Turning this up increases the number of pixel lights that render completely, but has performance repercussions.
I turn this up for high-quality urban promo shots and down for everything else.

____________________________________________________________


All blog posts by UnityGirl are inspired by my work with Brunelleschi: Age of Architects on the Aesop Games team. Download the current Unity client On IndieDB
____________________________________________________________


Wondering where Part 3 of the Oculus Pointer Trilogy is? I'm not done with it yet. :D

Tuesday, January 20, 2015

Unity Script: Oculus Selection Logic (2 of 3)

Oculus selection is something I've seen a lot of examples of in demo games, but almost no documentation on as to how to manage your selection. Here's some basic Unity logic I've learned while working on Brune's Oculus integration.
See how we made the pointer in post 1
____________________________________________________________


Goal

Selection: plain and simple. Choosing between game objects, which way to look, and what to interact with. Mainly this post is about how to use a pointer moved by the mouse (last post) that sends clicks where you want them to go.

____________________________________________________________

Obstacles:
Note the curve, and how each eye sees further to one side

Camera Distortion: It's important to keep in mind that the Oculus uses 2 in game cameras distorted together to simulate your eye-based vision inside the Rift. This also means that it's easy to aim at something with "one eye" and not really hit it within the distortion.


Mouse Function: I just haven't managed to get the windows mouse-pointer function in Unity to work inside the Rift. That said, OnMouseDown does work if referenced indirectly such as

public bool triggered;

void OnMouseDown () {
       Application.LoadLevel("MyScene");
}

void Update () {
       if  (triggered) {
          OnMouseDown();
       }
}

I use this to have Oculus and regular mouse function in the same script with the same click-response code.

____________________________________________________________

How to Trigger:
Building text and highlight appear when building is triggered


  1. Make a cube child object of the pointer named "PointCollider" (or whatever)
  2. give it a cube collider set to "Is Trigger" and a rigid body set to "Is Kinematic"
  3. transform it such that it makes a long thin line through pointer object on out into the world as far as you need. (make sure it goes far enough backward to tough the player)
  4. Put a collider and this snip of code on your click-responsive assets:

void OnTriggerEnter(Collider col) {
// this part keeps your script from responding to all collider interactions, only your pointer
       if (col.transform.name == "PointCollider") {
             triggered = true;
      }
}

void OnTriggerStay(Collider col) {
       if (col.transform.name == "PointCollider") {
             triggered = true;
      }
}

void OnTriggerExit(Collider col) {
       if (col.transform.name == "PointCollider") {
             triggered = false;
      }
}


____________________________________________________________

Example In Use

I've done it slightly different in this JS example, using if (Input.GetMouseButtonDown(0)) because OnMouseDown is linked to a GUI confirmation irrelevant to the Oc player.

____________________________________________________________

Raycasts

If you ask around about what to use for generic direction-based selection, much of the Unity community will suggest Raycasting. This is an invisible line you send out from a specified origin along a specified angle. If it hits something, it records what it hit.


Why I don't use them if I can help it:

a) conditionals for raycast hit can only be calculated in the script that sends the raycast. This means that
  • button-like scripts are useless 
  • trigger area scripts are useless
  • you are mostly reliant on tag-management to sort your responses
  • effecting other objects is a logistical pain
b) selecting what the raycast hits is a pain in the butt.
c) programming for Raycasts involves programming with catcher-scripts or backward-pointers that I find not-so-fun.


Why Raycasts are useful anyway and you'll see them later on:


They are the only way (that I know of) to select a point on a TEXTURE and not just a gameObject. Therefore we will be using a Raycast to handle the Web Vewier later.


____________________________________________________________

Wanna see how your Oculus pointer can select specific points on a Coherent UI web view? Tune in to final post of this trilogy next time! :D
____________________________________________________________


All blog posts by UnityGirl are inspired by my work with Brunelleschi: Age of Architects on the Aesop Games team. Download the current Unity client On IndieDB

Saturday, January 17, 2015

Unity Script: Oculus 3d Pointer (1 of 3)


One of the biggest obstacles to developing for the Oculus is simulating mouse. This post will take us through the first of three basic steps to get Oculus mouse integration working. We'll create a 3d mouse-object that follows the mouse-movement. Next time we'll add click-integration using triggers in post 2 and we'll finish with click-integration for Coherent UI web views.

____________________________________________________________

Myriad Limitations:

There are a couple of very good reasons why we can't just use the mouse the normal Unity way.
  1. Oculus won't display the windows mouse-cursor
  2. You can't hijack/alter the windows mouse-cursor at-all easily
  3. The windows mouse-cursor aims wrong through the Oculus distortion -even if you can see it-
  4. Oculus ALSO doesn't display Unity GUI, which only responds to windows-mouse anyway. (suggest 3d menu objects as well)

____________________________________________________________

The Solution:


A Unity-Object 3D Pointer

That's right. We're gonna take a Unity asset and turn it into our pointer with a few simple scripting tricks. We'll start with your player-camera and your pointer. I use a red sphere-object as default but you can use whatever works for you.


  • Create your object
  • Parent object under Right Eye Anchor
    •  this means it'll stick to the front of the head when you move
  • Transform thusly
  • It should look something like this with the pointer selected

  • Finally, add this script that will link the pointer-movement to your physical mouse movement. 
    • This responds like MouseLook and doesn't need the windows-mouse

____________________________________________________________

The Script


For Copying


using UnityEngine;
using System.Collections;

public class Pointer_Mock : MonoBehaviour {

public GameObject targetCam;
// Use this for initialization
void Start () {
targetCam = transform.parent.gameObject;
}

void Update() {
transform.LookAt (targetCam.transform);

float localX = transform.localPosition.x;
float localY = transform.localPosition.y;

float h = (localX += (Input.GetAxis("Mouse X") * 0.05f));
float v = (localY += (Input.GetAxis("Mouse Y") * 0.05f));
transform.localPosition = new Vector3 (h, v, transform.localPosition.z);

}
}

____________________________________________________________


All blog posts by UnityGirl are inspired by my work with Brunelleschi: Age of Architects on the Aesop Games team. Download the current Unity client On IndieDB