
Also, my game is green-lighting! Check us (and my animation work) out! :D
____________________________________________________________
Mecanim Humanoid
These are your magic words. As long as all of your assets can be set to this setting, I can help you.That said, here's what I got no non-Humanoid Models/Animations:
- Cross-overs are not guaranteed, try to use animations that come with your models
- You might be able to convert to Humanoid
____________________________________________________________
Models to Humanoid:
If you've got a humanoid model (head, hands, feet, general upright position) but it's not already set to Mecanim Humanoid, you are not hosed!
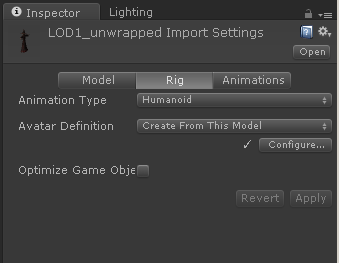
Find your base-model. Some packages come with a base and prefabs. This is the one with the model info in the Inspector when you click it.
- In the model info in the Inspector, click "Rig"
- Select "Humanoid" and "Create From This Model"
____________________________________________________________
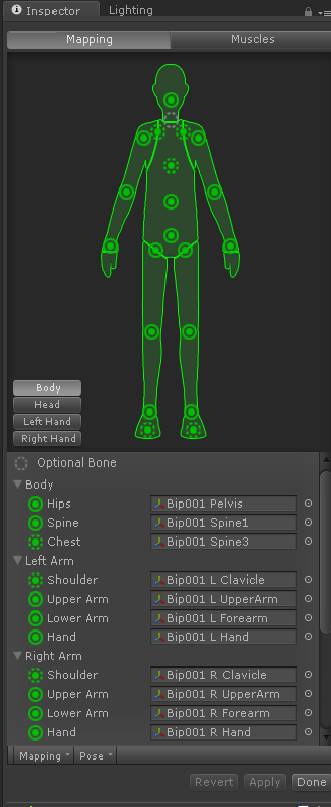
Configuring Your Humanoid
 Warning: Not all animations are equal. Your model can be rigged correctly but an animation may still manipulate the bones wrong. Some animations are broken, and some will ONLY work properly with their original models.
This shows you where Unity thinks the bones are. (Bones are what animations move around)
When you click "Configure" Unity will ask you to save any unsaved changes in your current scene. This is because we're jumping into a place-holder new scene to configure.
Check the settings and maker sure all the bones know where they are. If you find everything okay and make no changes, just load into anther scene and keep working.
If you DO make some changes, remember to click Apply then Done at the bottom.
____________________________________________________________
Fun Tip:
One of the model-packs I picked up had mouths that open and close. The animations that came with close the mouths, but most of my animations don't control that bone. Meaning any new animations caused their mouths to hang open, as if in enternal horror (not happy faces).
I solved this by going into the Configure settings and un-assigning the jaw bone. This set the mouths to the mesh-default closed state :D
____________________________________________________________
Configuring Your Animations
That's right, you're not actually -totally- stuck with the settings they came with. We're gonna set these to Mecanim Humanoid as well. If your animations were stored inside your imported model, they're already changed. If not, find the import object and select. You'll see a familiar Import Settings in the Inspector.- In the model info in the Inspector, click "Rig"
- Select "Humanoid" and "Create From This Model"
It's that easy. Not all animations will work like this, but most of them do. Now you've got Humanoid models and Humanoid animations that should work together.
____________________________________________________________
Animator Controller
While I have yet to master all of it's tricks, I love this little machine.Setting Up Your Controller
Like most things in Unity, it's easy to create one of these. Just right-click in the Project window and select "Create" --> "Animator Controller"
Now you've got an empty animator. Find your Animation Clips (the asset INSIDE your imported assets with the little arrow on gray square), then drag them into your Animator.
Fun Fact:
If you then click on the gray animation boxes in your Animator, you can replace the clip WITHOUT replacing the box-entry by dragging a new animation-clip asset into the inspector slot.
Arrange the animations to your liking. Remember to set the one you want to play FIRST as your Default.
____________________________________________________________
Animating the Models
 |
| Wizard Breaks it Down |
Here's the good part. One Animator Controller can apply to many models, letting players and NPCs have the same animations and respond to scripts the same way. Here's how we do it.
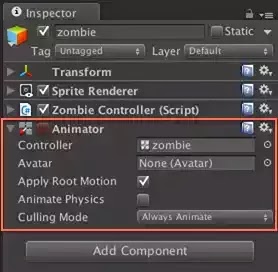
- Animator component on Models(s)
- In the Animator component. drop your new Animator Controller into the Controller slot
- VERY IMPORTANT - Make sure the Avatar matches your Model. Trying to animate with the wrong model will not work.
- Press Play
Finding Your Avatar
- Locate your model asset, the one with the Import Settings we chaneged to Humanoid
- There's a little arrow by that asset in the Project window, click it
- The last asset listed under your model-asset should be your avatar
- Drag that (little beige person icon) into your Animator component
DO NOT copy-paste the component onto a new model without replacing the avatar. The animation will not work unless the avatar matches the model.
Now all your models (if the animations work for them) can move together.
____________________________________________________________
Exceptions:
I'm not a model/rigging expert and bones beyond the Unity configure settings baffle me. I don't know why animations work on some models and not others, except that it probably has to do with how the bones are arranged and what the animations expect.
The mouth-open issue is a good example of a non-breaking incompatibility. Other failures I've seen include turned/backward limbs and, the most common, animations that cause the mesh to stretch badly or overlap itself unrealistically.
Stay tuned for Part 2: Working with Animations (for beginners)
___________________________________________________________

All blog posts by UnityGirl are inspired by my work with Brunelleschi: Age of Architects on the Aesop Games team. Download the current Unity client On IndieDB
No comments:
Post a Comment